Meiko is a nature reserve in Kirkkonummi, Southern Finland. The surroundings of the lake Meiko are popular for day trip hikers. We took a short trip in the sunny winter weather. The aim was to find the bunker located at Meiko’s southwest shore.
We were initially uncertain to take us out on the ice, but after we found an open fishing hole, we found that the ice was thick enough to hold our weight. We took a coffee break before we walked away west across the ice.
Because we knew there was a Geocache near the bunker, it was easy to navigate to the right place with the help of the Geocaching app, even though we didn’t follow any official trail. We were a bit unsure when we arrived, because the snow covered the ground, and we didn’t at first got a sight of the bunker. But the unnatural shapes of stones turned out to be concrete! So, we had found the bunker we were looking for!
The narrow vertical drop, which wasn’t the actual entrance.
At first we found some round concrete structures, and then we found the entrance, which was a narrow vertical drop with steel bars as a ladder. The odd thing was, that it wasn’t pitch dark in there. It turned out that the light came from the actual entrance, which was at the end of a long corridor. So we had taken us in the hard way …
The actual entrance
Getting out from the bunker (Photo: Emilia Grönholm)
There are several bunkers in the area of Meiko, and they are all from the Porkkala parenthesis period. The area was leased to the Soviet Union in 1944, and was returned to Finland in 1956.
In mid Oktober, it was time for our annual autumn hike with Emmi, Henrik and Lisa. This time we headed for Nuuksio National Park, not far from home, simply for not having to sit in the car for so long. Our plan was to stay for two nights. The focus was on good food and enjoyment. Besides the usual breakfast we had packed pork fillet, vegetables, sausages and ingredients for hot sandwiches in our backpacks.
On Friday, we arrived quite late to Nuuksio. We left our car in Solvalla, where we threw our bags on our backs and walked away to the east. We had aimed to hit up camp at Urja or Valkialampi. After an hour of hiking the sun set down, and our walk turned into night orienteering. After wandering through rough bushes and shrubs, hills and valleys we found the first campsites. There was a full house, and we decided to go ahead. At Kattilajärvi we finally found an empty fireplace. In the darkness it was still pretty challenging to find the perfect tent place in the bumpy terrain. The dinner, or rather supper, was the big program number for the evening. Another program number was the little mouse that ran around our tents, but even at that stage we did not know how much attention the mouse would finally get…
At breakfast the next morning, Emmi claimed that something had chewed on the cheese container. The rest of us were convinced that the chewing marks were not caused by any rodent or any animal in general. The food had been inside a closed backpack for the whole night! Well, this will continue later … Sadly… So read on!
We wandered off against Luukkaa area and took a lunch break at Kaitalampi west side.We went ahead and rounded the lake from the north and camped at a fireplace by the eastern shore. The tents we pitched on a hill with a nice view over the lake. We spent the evening cooking hot sandwiches and grilled sausages. Then it was time to seek out the sleeping bags for the night.
04:50 a.m. it happened! There was a hard rustling in our vestibule! Drowsy, we tried to find out the origin for the rustle. When we opened the zipper to the vestibule it went quiet, and when we put our heads back on our pillows the mysterious rustle started again. We woke even our tent neighbours when our detective maneuvers became too loud. But in the end we got the culprit in the act! A mouse was standing in the spotlight of the headlamp on my backpack! We started to check our bags, and it was at that moment we noticed the devastation! The mouse had gotten into Lisa’s backpack through an opening with velcro and then chewed through a thick waterproof bag! The mouse had found our breakfast bread and it was like someone had taken a mega bite from each slice of the bread! The whole bread package flew out of the tent, and in the end we managed to sleep undisturbed the rest of the night.
In the morning we ate breakfast without any bread … Only cold cuts and porridge … It had clearly been a mouse also the first night when someone had chewed on the cheese container. What we do not know, is if it had been the same mouse that had traveled around in some of our backpack? This was the first time I experienced an animal thief on a hike. Maybe I should be more hawk-eyed next time!
In Espoo archipelago there’s an island on the sea called Pentala. On this island, there’s a lake. On the lake there’s an island. That was our destination!
There are couple of reasons why we wanted to visit this island. The firstintroductionwe gotof this place was froma board game that we played many years agowith my friends.The board gamewas published in 1992 by thekayakingclubCanoafortheir60th anniversary. In the game you are kayaking aroundand collecting bird observations. The rarer the birdsare, the more points they are worth. There is also a dodo in the game, andsince itis extinct since 1700 it’s worth the most!
In the gameyou can carry your kayakon land, for example if youwant to visit the island on Pentala. So, it was from this game we got the idea to do this same thing in real life! We were also assured that we were going to find the extinct dodo on this island! We also knew that there was a geocache on this island, so we definitely had to log that as well!
On a sunny day we jumped in our kayaks and started paddling towards Pentala. We started our tour near Hirsala, so it didn’t take a long time to reach our destination. We stranded on a beach in the south of the island Pentala. From there we took a path towards the lake carrying on one kayak. We chose the wrong path, because we ended up climbing over the highest point before we reached the lake. The distance was about 400 m. But it was really worth it!
A coffee break on the beach before our adventure
Let’s go! Towards the lake!
Uphill and downhill
A little bit of jungle…
A shorter kayak would have been easier to carry in the woods.
The lake was surrounded by green leafy plants, the water was completely still, except for a few waves a pair of swans caused. And there on the lake, we saw our destination: the island!Inturns,we jumpedin the kayak and paddled around the island. We also stranded on the island and logged the geocache, as it was one of our goals.
Yey! I’m kayaking around an island on a lake on an island on the sea!
On the way back we found the right path, and it was so much easier to carry the kayak that way! Sadly, we didn’t spot any dodo birds, but now we can check one item from our bucket lists 😉
The summer is around the corner, but it’s time to look back at the Svalbard winter expedition for one final time. The focus is now on the gear I used during the trip.
On my final equipment list for the Svalbard expedition, I had 126 items. Some of the list’s items, which belonged to the category unnecessary, I removed during the planning phase. The removed items were most spare clothes and spare equipment. The rest of the equipment on the list was more or less important or necessary. Some equipment belonged to the category comfort, but those equipment contributes greatly to how you enjoy the journey.
You can download my equipment list for the Svalbard 2016 expedition: Svalbard2016 GEAR (PDF)
Below I have listed the top 5 equipment that I experienced that contributed to how comfortable and successful the journey was. I would absolutely take with me these equipment again on asimilar winter expedition.
Top 5 Winter Expedition Equipment:
1. Inflatable Mattress – Thermarest NeoAir All Season
A month before the Svalbard expedition, I did a short winter tour in Koli National Park. It was the first real winter test for my Thermarest NeoAir All Season mattress. I had used it several times in the summer, autumn and spring, but never in the winter. It was under that trip I concluded that it’s a thousand timesmore comfortable than a foam mattress and I was really rested in the morning. On Vatnajökull, for example, I slept directly on my Thermarest Ridgerest Solar foam mattress, and I remember that my arm got numb every night and my back hurt in the morning. It was easy to take the decision tobringthe mattressto Svalbard. I like the mattress because it’s light, warm, comfortable and when deflated it doesn’t take much space. In the winter it is not good to inflate the mattress by blowing, because the moisture is collected inside the mattress and then freezes. Therefore I have a small battery powered electrical pump to the mattress, but to Svalbard I borrowed a pump sack from a friend, because the electrical pump is not so efficient. The pump sack worked great after you got used to it after couple of days. Under the NeoAir I had the Ridgerest foam mattress, just for safety’s sake, if the NeoAir would have gone flat.
2. Vapour Barrier Socks – Rab VB Socks
First some information aboutVB socks.The idea is to dress a pair of liners on your feet as base layer, on top of those these waterproof VB socks,and outside of those a pair of thick and warm ski socks, and of course the ski boots on top of that. In this way the moisture will not get through fromthe feet to the warm socks and boots, and that prevents freezing condensation and they hold heatbetter. These Rab VB Socks wasthe equipment that I was most skeptical about, but because the socksweighed almostnothing, I decided to take them with me. I had heard very good reviews aboutthem, but I hadn’t had time to test them properly before departure. Once we set of skiing on Svalbard I decided to give them a try, and I was really, really surprised how well they worked. I was worried that the socks would cause chafing or blisters, but in the end I think they prevented that. Under the whole trip I got only a few small blisters under my big toes and a small blister on one of my heel. With some sports tape I easily fixed those problems. The ski boots and the thick ski socks were dry throughout the whole expedition.
3. Ski boots – Crispi Stetind GTX
Last year, during the expedition on Vatnajökull, I had a pair of ski boots (Alpina BC 1550) that weren’t so good. Actually they were horrible. I got some nasty blisters on my feet, which affected negatively my skiing. They weren’t waterproof at all, so I had soaking wet boots throughout the whole trip, except for couple of days I dried them directly over the cooking stove. In the early winter I bought a new pair of ski boots, Crispi Stetind GTX. I was first worried that I wouldn’t have time to break them in, but I had time to make a few ski trips with the boots before the expedition. In most of my shoes and boots I use custom made insoles, because it’s really difficult for me to find shoes that fits my feet. For some reasonthe insoles in the Stetind bootsfitperfectly my feet, and they were really comfort. The boots are very steady and sturdy, but enough soft for skiing. The thing I like most is that they are waterproof! If you like to go uphill with crampons, the Black Diamond Contact Strap fits perfectly on these boots.
4. Devold Merino
Under a winter expedition you don’t change your clothes so often. Therefore you have to wear really comfortable clothes, especially for the base layer. I haven’t tried many brands of merino wool garments, but I have been really satisfied with the Devold Expedition brand. On Svalbard we changed our base layers once, except for our underwear that we changed more often.
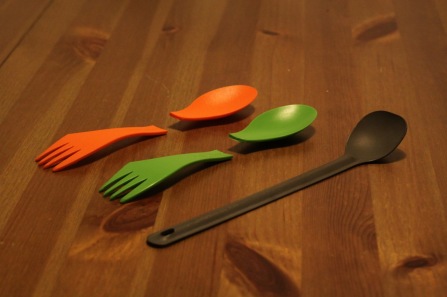
5. Durable spoon – Sea To Summit Alpha Long Spoon
The Sea To Summit Alpha Long Spoon is the best spoon when you are eating directly from freeze dried food bags. Because of the length of the spoon, it is easy to get all the way to the bottom of the bag. One more thing is that it’s really durable. I hadn’t thought much about this feature, but in harsh expedition conditions it’s proved to be an important feature. To Svalbard I had with me one Alpha Long Spoon and two Light My Fire Sporks. I use Sporks when eating in the tent. Both of my Sporks broke into two pieces. The total amount of broken Sporks in our three person tent, during our expedition, was four! Well, the cold temperature and the frozen food may have had something to do with the breakage of the Sporks, but now I understand why some spoons are made from strong aircraft aluminum alloy. Maybe I will til the next expedition get a Spork Titanium? The cons of the aluminum or titanium spoon is that it’s not Teflon friendly.
The Alpha Long Spoon compared to the two broken Sporks.
If you are interested in the winter clothing, I have written a separate blog post about Layers For the Cold.
The trip was organized by Ankarat Avotunturit. If you are interested in arctic expeditions I recommend you to check out their courses, programs and expeditons: Ankarat Avotunturit.
The final preparations for the Svalbard expedition are in full swing! We are flying early in the morning, but everything is finally packed ready. It looks as if my final weight of the sled will be below 70kg, which is nice! The last thing I have done is to update the playlist on my iPod, but I realized that I had not so much music on my computer, so it will be for me to listen again and again the same songs…
I’m glad I’ve packed my warmest sleeping bagcombination, because the forecast is on the cold mode in the beginning of the week… Luckily the weather gets warmer by the end ofthe week.
When I’m planning the food for longer trips, I try to make the food as easy and lightweight as possible. It can be fun to sometimes luxury something up, but I like simple meals that are easy and quick to cook. I’m not really choosy when it comes to food, but some may think that my menus looks a bit too monotonous. The most important thing is that you really like what you eat, so that you easily can take in energy.
Winter expedition food are little easier to plan, and here’s the reasons:
Weight: You’re pulling your stuff in a sled, which is for volume much larger than a backpack and you can pull a lot more weight than you can carry, so you can take some weighty gourmet food with you.
Durability: You can take fresh food with you without fear of rancidity, eg cheese, ham and butter, as the temperature remains low.
Water Sources: You get water anywhere, just as you can melt the snow. So the only water you need to pull in the sled is what you need during the day for drinking and lunch.
Menu for the Svalbard expedition (19 days):
Food for 3 weeks: potato mash, porridge, blueberry soup, chocolate drinks, sports drinks, minced meat of moose (dried), freeze dried lunches (add water), coffee and coffee creamer, beef jerky, multivitamins, cookies and chocolate with nuts. Still missing from the picture: Bread, butter, cheese, ham, 10 x freeze dried lunches and some more chocolate and nuts.
For the winter holiday we planned a few days adventure in Koli National Park. We had enough of the little snow here in Southern Finland, so we thought Koli would be a good choice for a little winter adventure. We drove off to Koli from Helsinki in the afternoon and arrived at midnight. We planned to put up our camp at Rykiniemi camp site, because the site was just a few hundred meters from the nearest parking lot. That way we would not have to walk long distances arriving to camp late at night.
Arriving at the campsite in Rykiniemi
What surprised us was that no one had visited the camp site for several days or maybe weeks. The official parking lot was completely unplowed. We plopped into the untouched snow in 0°C temperature to the camp with our stuff. After a quick reconnaissance of the camp site we pitched our tents and prepared ourselves for the night.
In the early morning we woke to some loud thumps and the whole tent shaking! We already believed in our tent that the neighbor tent had awakened to challenge us with a snow war, as that would have been totally expected… But after a moment we figured out that the noise was caused by heavy snow falling down from the trees above us.
Ski touring on Lake Pielinen
The next day we skied out on the lake Pielinen for a day trip. We took the direction north toward the elongated island Laitosaari. There were a lot snow on the ice, so we skied / plopped in the heavy snow that stuck to the bottom of our skis… After 5 km skiing we reached the fireplace at the lagoon of Laitosaari. There, we held a lunch break in the heat of the fire.
When we started to ski back the weather changed, so we felt like polar skiers in the strong head wind and snow. It was difficult to follow our old ski tracks because they begun to disappear. It was already dark when we arrived back to the campsite in Rykiniemi. The temperature started to drop. Weenjoyed the eveningin theheatof the fire, but in the end we decided to organize a Yatzy evening in one of the tents.
Snowshoeing the Summit Trail
The following morning we packed the camp and drove towards Koli Centre Ukko. The weather had turned into a brilliant – 8°C winter weather. We put the snowshoes on our feet and wandered off along the Summit Trail or the Koli Peaks Snowshoeing Trail, which is a 1.6 km circular trail that takes you round Koli’s best-known scenic points. It starts from the Visitor Centre Ukko from where the journey goes on to Paha-Koli, Akka-Koli and Ukko-Koli.
Koli is worth visiting, especially when the snow situation is much better there than in Southern Finland. I will certainly be visiting Koli again and maybe next time it will be a summer or autumn adventure. After the trip I also updated the review of the Bergans Trollhetta 3 tent.


")
")
")
")
")