DIY: Compass Stand for Winter Expeditions

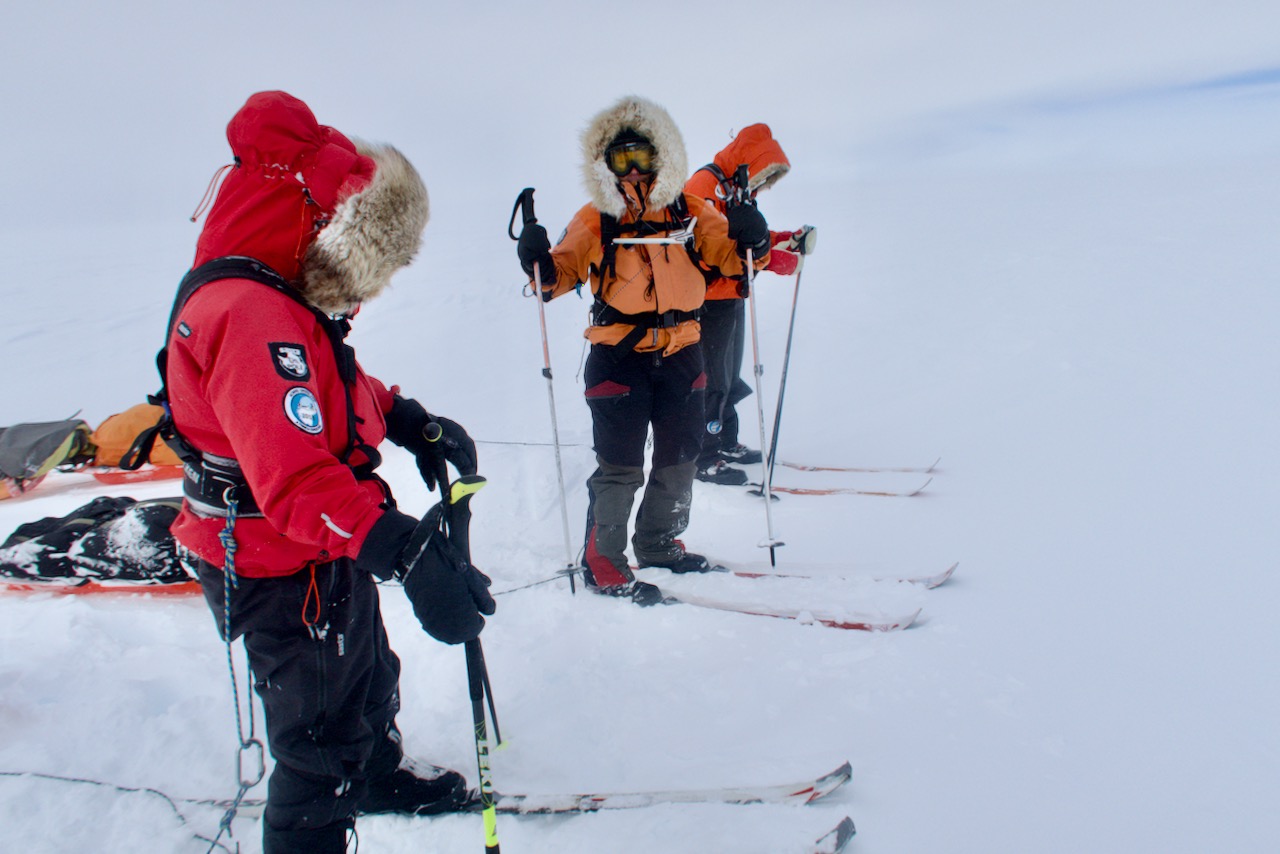
Many of you have asked details about the compass stand that we used during our Greenland crossing. Finally, I will give you details and drawings, so you can build your own! We (our expedition) think that it is the best compass stand there is! And it’s also a nice DIY project!

The most important thing is that you have the compass stand attached to the harness high enough, at chest height. (See the pictures below.) In this way, you don’t have to ski with a bent neck, and at the same time you can see ahead and clearly the compass itself. It’s also really easy to build and lightweight! We used Fjellpulken’s harnesses and the carabiners of our compass stand were a perfect fit for the harness! The cord lock allows you to lower the compass stand down if you have a break, and you don’t want the compass to be in you way.

What you need:
– 74 cm plastic tube (I used 16 mm in diameter, electrical PVC pipe)
– 2 x carabiner (I used the Edelrid Wiregate Accessory Carabiner 40 mm)
– paracord 2-3 mm
– rubber band 3 mm
– cord lock (I used a cord lock like this)
– and of course the compass… 😉

In the drawings the rubber bands are marked with blue, red and green, and the paracord is black.

You can download the drawing as pdf here:

DIY Pack Pouch

IMG_1620
Voilà! Here’s the final product: A box shaped pouch (medium size), so you can keep better track on your stuff in your backpack.

To pack things right when you are hiking or tour skiing, is completely a science of it own. Especially when you are going on a tour with a backpack on your back, it is good to think about how and in what you pack your stuff. You should have good order in your backpack to avoid going crazy trying to find something you do not know right where you’ve packed it. Waterproof pack bags with roll closures are good, but it’s hard to keep track of things in the bags, especially when the bags often tend to have small openings. It often happens that you have to empty the entire bag to find something, for example a headlamp. To keep a little better track of the smaller things I have come up to the following solution: Smaller things can be packed in box shaped pouches, that are sewn from a thin, lightweight fabric and has a long zipper, so you can see what you have in the bags without emptying them. I’m not a pro at sewing, so you can try this project safely!

IMG_1647
The box shape will keep your stuff in place, and you can easily access all the stuff without emptying the whole pouch. This is the large version.

I purchased the fabric from Eurokangas in Tapiola. They had a big box full of different kinds of outdoor fabrics, so I had lots of options. I chose the fabric that seemed lightest but yet strong. From the same shop I got also the zippers.

Note: Depending on the fabric it can become more or less difficult or easy to do this project. I tested first with a fabric that had a plastic layer on one side, but it caused problems because the sewing machine did not pick up the lower thread, and therefore sewed empty. I tested with many different settings, needles and threads, but I did not get it to work. I do not know if the reason for this was the sewing machine or the fabric, or perhaps the  sewer’s lack of experience…. With an other fabric, without the plastic layer, it worked just fine. You can use which measurements for the pouches that you want, but here’s the measurements I have used for the fabric:

Small:  32 cm x 19 cm    Medium: 42 cm x 26 cm    Large: 60 cm x 40 cm
The zipper has to be at least as long as the shorter side of the fabric.

Here are the steps and pictures for the project:

Continue reading “DIY Pack Pouch”